River Flow Mitts
Construction
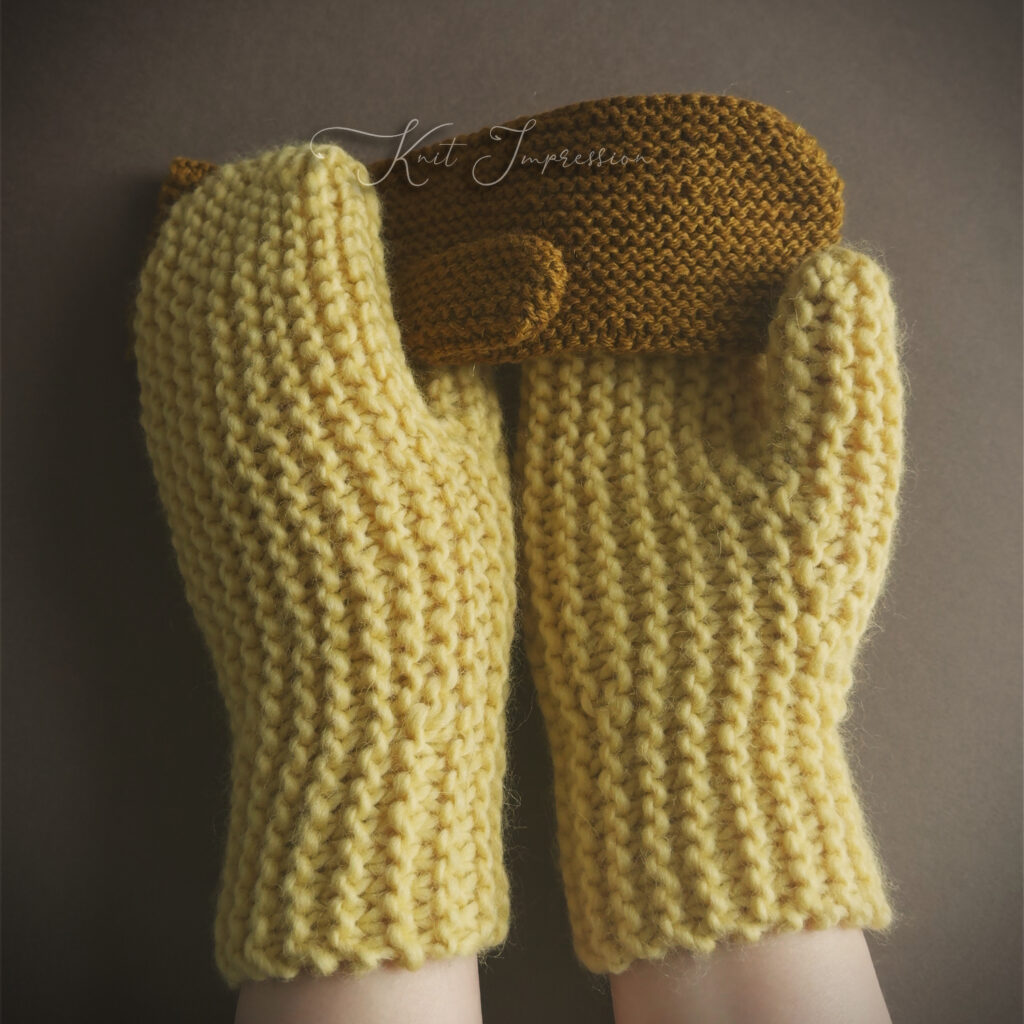
River Flow Mitts are worked sideways (not in the round): begin at one side of the wrist, work across the palm to the fingertips, then back to the opposite side of the wrist. The thumb is integrated and worked together with the mitten. Both the cast-on and the finish are very clean – the edges are invisibly grafted (Kitchener) so no seam shows in the finished mitt.

Techniques Used
- Worked entirely in knit stitches – garter stitch (no purling)
- Judy’s Magic Cast-On, modified for garter.
- Increase: M1L or M1R.
- Decrease: k2tog.
- Magic Loop technique.
- German Short Rows.
- Invisible garter graft (Kitchener stitch).
Skill Level
- Adventurous beginner.

Yarn Weight and Available Sizes
The mitten size is calculated with an automatic calculator. You can use any yarn weight. Hand sizes range from baby to XXL.
Required Materials
- Main needles:
- Adult sizes – circular needles 47″/120cm or longer (59″/150cm best). Alternatively, use two circulars, 24″/60cm and 32″/80cm or longer (40″/100cm each best).
- Child sizes – circular needles 40″/100cm or longer (47″/120cm best). Alternatively, use two 24″/60cm circulars or longer (32″/80cm each best).
- Additional circular needles (for cast-on) – 32″/80cm or longer. If your main needles are 3.5mm (US 4) or smaller, choose needles half a size larger; if they are 4 mm (US 6) or larger, go one size up.
- Large blunt tapestry needle – for invisible grafting (Kitchener).
- Large sharp sewing needle – for securing yarn ends.
- 6 locking stitch markers.
Needle Choice
For this project a slightly denser gauge works best. Choose working needles half to one size smaller than you usually use so the fabric is slightly firmer.
Size Determination
Gauge Swatch

Knit a garter swatch at least 12 × 12 cm.
Measure:
- Stitches per 4”/10cm (width).
- Ridges (1 ridge = 2 rows) per 4”/10cm (height).
Use a ruler at least 4”/10cm long.
If you don’t reach an even number of stitches or ridges, record decimals (e.g. 18.5 sts, 22.2 ridges).
When knitting the mittens, try to maintain the same gauge as in your measured swatch.
If using yarns that shrink/stretch after washing, wash and fully dry the swatch before measuring – this ensures that your finished mitts retain the intended size after laundering.
Hand Measurements

Two hand measurements are required:
- Hand length – from the tip of the middle finger to the wrist line (where the palm ends).
If you have very long nails, include their length in the hand length measurement.
- Hand circumference – around the widest part of the palm at the knuckles.
Use a soft tape measure. It should lie snugly on the skin without squeezing.
For greater accuracy, include decimals (in the photo, the hand length is 18.3cm, and the circumference is 18.7cm). This allows the calculator to determine a more precise fit.
If exact measurements are unavailable, choose a standard size from the provided size list.
Automatic Size Calculator
The calculator automatically generates knitting parameters based on your yarn, gauge, and hand measurements.
You can find the calculator at: https://www.knitimpression.com/rfm-calc/

Accuracy & yarn choice
The calculator is tuned so the mitten fits the measured hand comfortably. Most accurate results are achieved with traditional plied wool yarns (single or multiple plies) – such as sheep’s wool, merino, cashmere, alpaca, and other wools and their blends. These fibres adapt well to the shape of the hand. They also maintain a consistent gauge, ensuring a reliable fit.
You can also use non-wool yarns like cotton, viscose, bamboo, or silk. However, these fibres have little or no elasticity. The calculator will automatically adjust the mitten size and proportions to ensure comfort, but the result will not be as form-fitting as wool.
The calculator is not optimised for unplied or novelty-structured yarns such as blown, chainette, bouclé, eyelash, and similar types. If you choose to knit with these yarns, be aware that the finished size may vary considerably from the intended fit – the mitten may turn out either too large or too small.
Every yarn has its own unique behaviour and stretch properties. As a result, even when all instructions are followed carefully, the finished size may differ slightly from what was intended. If, after trying it on, the mitten feels too snug or too loose, consider adjusting the height (H) and/or width (W) accordingly and knitting it again.
If you are working with blended fibres, please select the appropriate category in the calculator:
- If the yarn contains at least 70% wool, choose Wool;
- If the yarn consists of 50% or more plant-based fibres or silk, choose Non-wool fibres.
We do not recommend using fragile yarns that break easily. This pattern is finished with a Kitchener stitch, which places considerable tension on the yarn and may cause it to snap. If you still decide to use such yarn, we suggest reinforcing the join with an additional stronger thread – for example, a fine sewing thread or a strand of silk mohair.
Yarn styling ideas

This pattern lends itself to creative combinations. Feel free to explore colours, textures, and fibre blends. You can knit with one or multiple strands, combine different fibres or shades. If adding a mohair-silk strand, we recommend using two for extra softness and loft.
If you’re looking for inspiration, below are several yarn options that work especially well for this pattern.
Variegated Yarns
Because the mitts are worked lengthwise, variegated yarns emphasize the construction even more:

Gradient yarns – you can use one gradient across both mitts to create a continuous transition.

Sock yarns with patterns – the patterns break into playful, unexpected motifs in garter.

Hand-dyed yarns – the garter texture turns them into colourful mosaics.
Marled knitting

The marled effect is achieved by knitting two or more different colours held together at the same time. Thanks to the sideways construction, this combination nicely emphasises the construction lines. You can pair strands in different shades, or even mix textures – for example, one smooth and one fuzzy. This approach works especially well for men’s mittens, where we recommend muted tones or various shades of grey.
Shiny Mittens

For a more elegant or festive version, try shiny yarns like viscose or mulberry silk. To add softness and a halo, pair them with 1–2 strands of mohair-silk. These mittens will be lightweight, soft, and gently fuzzy.
Textured Yarns

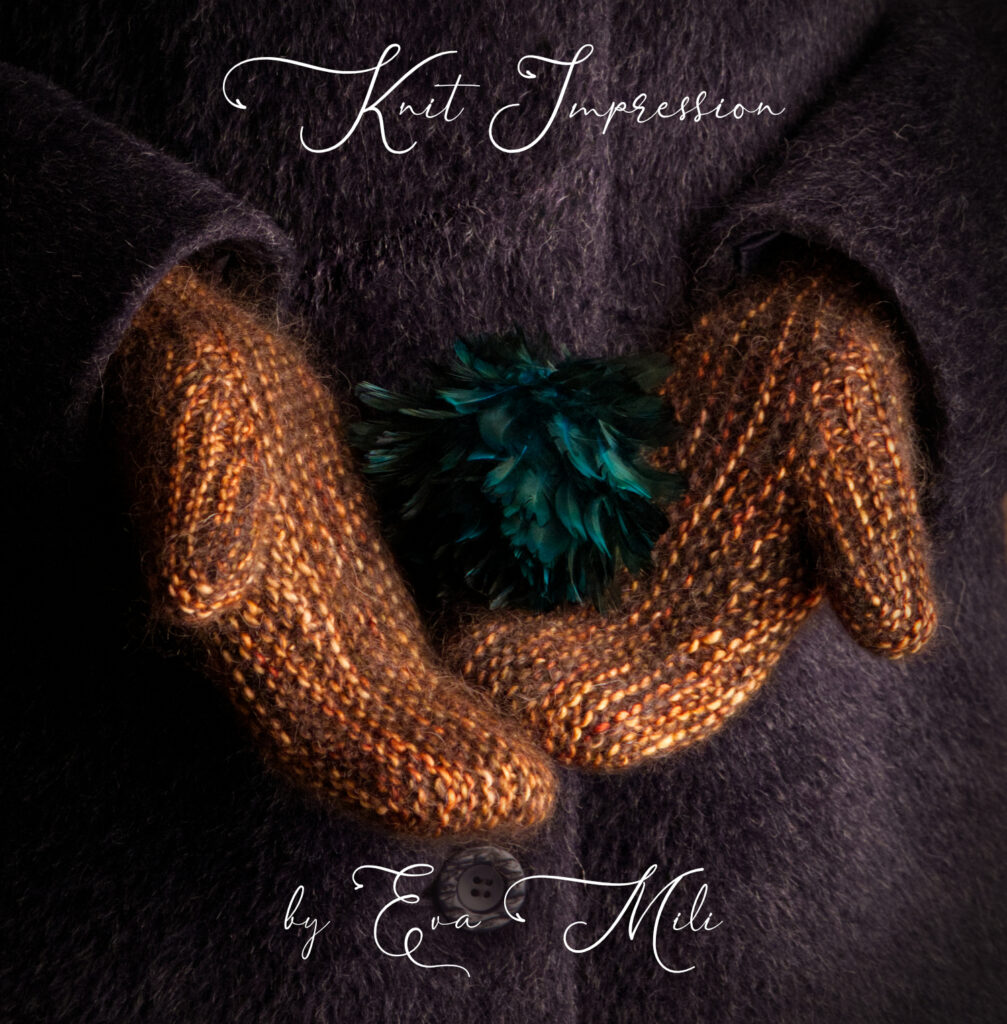
Garter stitch brings out the character of textured yarns beautifully, making it an ideal choice for materials like tweed or rustic-spun wool. Mittens worked in such yarns feel refined yet contemporary.